|
|
|
 PROJECT 2: PATCHWORK PIGGY BANK 
Materials
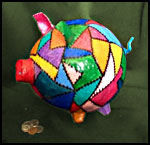
1 Balloon How to Make Patchwork Piggy Bank Blow up your balloon. The size of your balloon will determine the size of your bank and is your choice. If you have never made papier-mâché, review the instructions in our technique section. Apply two layers of paper to the balloon and allow to dry. Remove the balloon after the first layers are totally dry. While the first layers are drying, cut four feet from a cardboard egg carton. Use the points that divide the cups and leave as much of the surrounding cup as possible. This is be folded and taped to the pig body. Make all four legs the same size below the fold. Use masking tape to attach the flat fold to the underbelly of the pig body. Set it on a flat surface to make sure he doesn’t wobble. Use the card stock to make ears. Lightly draw what you think is a good ear shape. Draw a line across the ear at the point you think it should start to fold forward. Now you have to draw down and out. This makes the ears wider at the bottom. Cut a slit up to the horizontal line and overlap the bottom, creasing and urging the ear into a proper shape. Don’t obsess too much. These are fantasy pigs and the ears can look anyway you want them to! Use tape to attach the ears to the head. Cut a small piece from the end of a paper tube and tape to the head for a snout. The chenille stem will be the tail. Leave a couple of inches at one end straight and then make exaggerated curls and bends. Keep in mind that this will be covered with papier-mâché making it thicker. The exaggerated curls will become normal when covered. Tear off three pieces of masking tape, about four inches each. In turn wrap each one by placing the middle of the tape at the straight section of the chenille stem and bringing the ends around, crisscrossing at an angle, bringing the ends flat. Stick the end into the hole left by the balloon and press the tape firmly to the body. Do the same with the next two pieces of tape, using different sides to start. This will hold your tail firmly in place until it is covered with paper. Next cover the body and all the parts you have added with four or five layers of paper, allowing drying between every two layers. The extra layers are needed for strength to hold all the coins you will be saving. For the snout, use small pieces of newspaper soaked in the paste and fill the tube. Once it begins to dry make indentations for the nostrils. Sand lightly and put one final layer of tissue paper for a smooth look. When this is dry, prime with one coat of gesso. Of course, you can paint your pig in any manner you choose. To make the patchwork design, use a permanent black marker to draw the lines. Just keep building one shape on the next. Paint each shape a different color. Don’t worry about getting paint on the black lines. Once your paint is dry completely, retrace the lines and make horizontal “stitches” along each one. Seal the entire pig. I used decoupage glue as a sealer just because I thought it would give a little more strength to the finished project. Now just start saving |